Disclosure: this page may include affiliate links which may earn me a small commission at no cost to you. As an Amazon Associate, I earn from qualifying purchases.
Too sore to get out of bed? I know how that feels. :)
Muscle soreness one or two days after an intense workout is completely normal and can be caused by aerobic or anaerobic activities.. It can be especially bad if you haven’t exercised for a long period of time or if you’ve upped the ante of your current workout program.
It’s known as DOMS:
Delayed onset muscle soreness or DOMS is micro-damage caused to the muscle fibers and connective tissue from exercise. DOMS is a harmless condition that typically lasts a few days.
Wouldn’t it be nice if there was a way to help reduce that tight and sore muscle feeling more quickly than nature? Ten years ago, I probably would have told you to tough it out. However, now I have a much better suggestion: Foam Rolling!
What is Foam Rolling?
Foam rolling is a form of self-myofascial release, which is just a fancy term for self-massage. Foam rolling releases the tightness and knots that form within the muscle by helping to elongate the muscle tissue by breaking up scar tissue and any trigger points.
What’s a trigger point? A trigger point is an area in the muscle that can lead to pain in other areas of the body. For example, a trigger point in the back muscle could be causing your neck pain.
Foam rolling also helps bring more blood to the muscles. This increase of circulation helps speed up the muscle recovery process. A side benefit of foam rolling is that it will also help with flexibility – something you can never have too much of.
The Fundamentals of Foam Rolling
Here are the basic rules of foam rolling:
Roll slowly – you should not be moving at more than one inch per second
Pressure to the muscle group you are working should be moderate – think Goldilocks, but in this case, not too hard, not too soft…just right
This pressure should produce a slight amount of discomfort. While foam rolling can make you feel really wonderful after the fact, it isn’t always the most pleasant experience
If discomfort becomes painful, you have found a muscle knot/trigger point
When a knot is found, do not continue to roll – instead, pause for 5-30 seconds and rock the area that is knotted back and forth slightly (side to side if you were rolling up and down.) The knot should release within that timeframe, but if it doesn’t, workaround and back to the area again until it does
Lower Body Foam Rolling Exercises
How to Foam Roll the Calves
Begin by resting your lower leg (think Achilles tendon) on the foam roller. Your toes should be pointing upward throughout the movement. If you need more pressure, cross your non-working leg over your other leg.
Lift your hips off the ground and slowly roll the entire calf muscle from bottom to the top, which should end up just below your knee. When you hit an area where you feel a knot(you’ll know when!), stop and apply pressure to this area – then continue on.
TIP: You should also hit the inner and outside areas of your calves by turning the leg in and out. For most people, the inside area of the calf is the tightest.
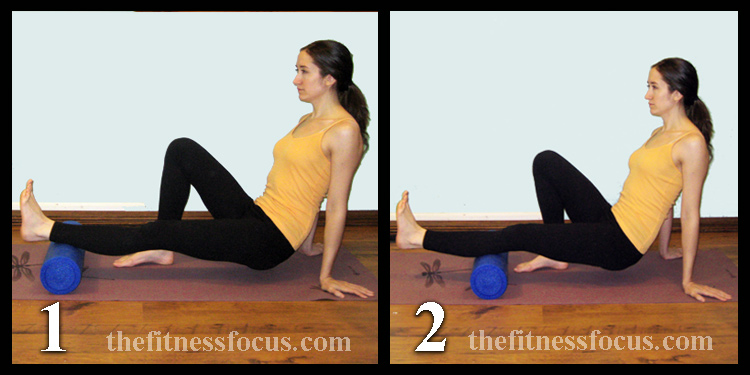
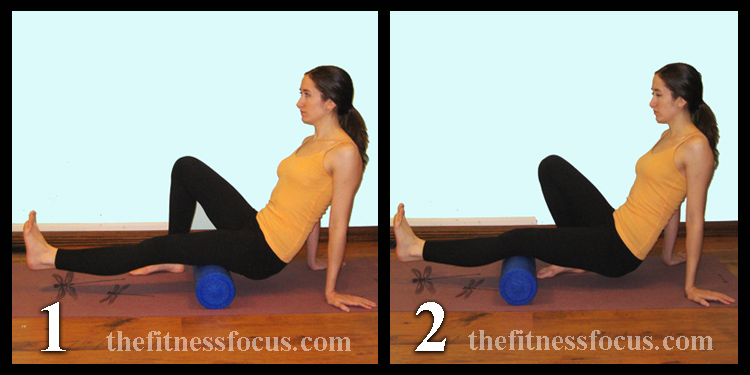
How to Foam Roll the Hamstrings
Start by placing the foam roller at the top of the hamstring, right below your butt.
Work the roller down towards the knee. Again, pause until any tightness dissipates.
TIPS: To add more pressure, cross one leg over the other. As with the calves, be sure to hit the entire muscle by angling your leg in and out.
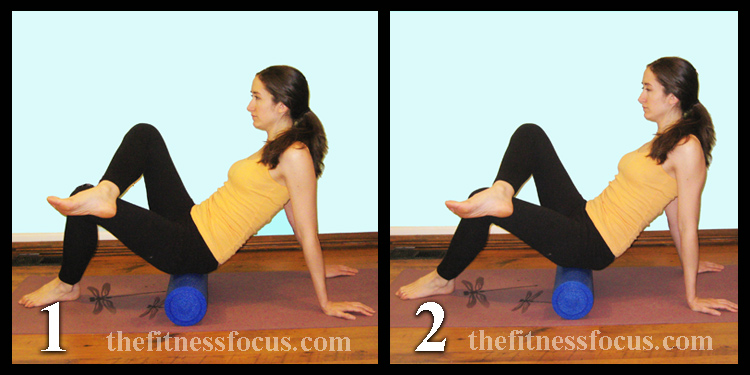
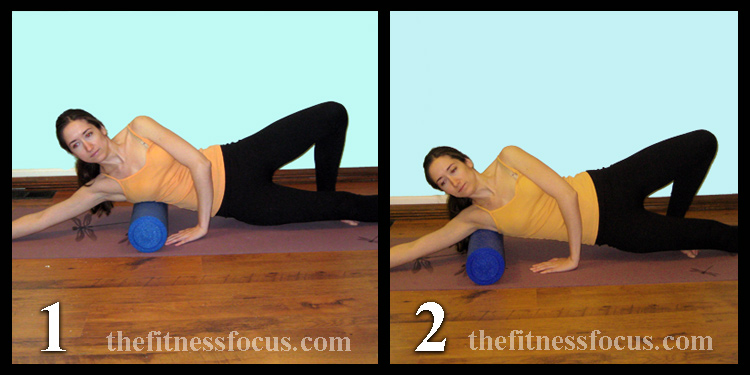
How to Foam Roll the Glutes
Tight glutes can be the cause of a lot of pain elsewhere in the body, specifically in the knees and the lower back. Foam rolling the glutes can release these trigger points, allowing for pain-free movement. If you have sciatic pain, this foam rolling exercise is a must.
To begin, sit with one leg crossed over other while sitting on top of the foam roller. You should almost be sitting directly on top of the foam roller with the roller at the top of your glute muscle towards your lower back. Lean slightly towards the leg you’re working.
Roll your way down. The entire movement is not more than a few inches, so be careful not to “fall off”.
TIP: Shift your body weight to the center and then lean to the other hip to hit the different areas of your glute, and then move on to the other side.
How to Foam Roll Quadriceps
Tight quadriceps can lead to knee pain and even poor posture.
Lie face down with the foam roller up near your hips. You can either do one leg at a time or two. I like doing two at a time.
Work the roller down to just above the knees.
TIP: As the quads are a very large muscle group, you will want to hit different angles on the foam roller by turning your feet both in and out. You will need to do one leg at a time when working the various angles
How to Foam Roll the IT Band
The IT band is not a muscle, but it is another common source of pain – especially for runners. The IT band is a long series of connective tissue that runs down the outside of the hip down to the outside of the knee.
To foam roll this area:
Lay on your side with the roller just below the hip bone.
Roll down to just above the knee, keeping your forward foot flat on the ground to stabilize your body.
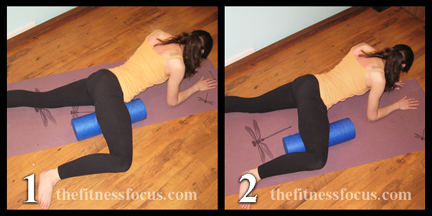
How to Foam Roll the Abductor Muscles
The adductor muscles are the muscles that run along your inner thigh. Tight adductor muscles are a common reason why people feel tight in the hips. Keeping the adductors loose is very important for hip mobility and to obtain the proper form of lower leg exercises such as the squat.
To foam roll the adductors, you are going to have to get into an awkward beginning position. It is by far the most ridiculous position you’ll have to get into.
Place the foam roller under your upper inner thigh. To do this, you will need to lay on your stomach with your knee bent up and out to the side and place the foam roller up near your groin.
You then want to work the roller down towards the knee, but do not tense your inner thigh.
TIP: Make sure to not allow the upper body to turn; your torso should also remain parallel to the ground.
Upper Body Foam Rolling Exercises
How to Foam Roll the Lats
So, now that you know how to foam roll your lower body, it’s time to foam roll your upper body. To foam roll the lat muscles:
Lie on your side with your bottom arm extended, but relaxed. The foam roller should be positioned about midway up the torso just above the bottom of your ribs.
Work the roller towards your shoulder – it should end up being right up in your armpit.
TIPS: Most people are very tight under the shoulder blade (I sure am!) When you hit a tight/painful area, continue to breath and work through it for 5-30 seconds.
As with many of lower leg exercises, you can change the angle to hit a larger area of the muscle group.
How to Foam Roll the Back Muscles
To begin foam rolling the back muscles:
Place the foam roller under the middle of your back. You can gently support your head with your hands clasped behind the back of your head, or you can cross your arms over your chest – whatever’s more comfortable. Lift your hips up off the floor.
Roll your body down, so the roller massages up to the upper shoulders. Keep your hips off the ground for the entire range of motion.
TIP: Remember do not go down to the lower back or up past the shoulders to the neck.
When Can You Perform Foam Rolling Exercises?
Before workouts
After workouts
When you wake-up
Before you go to bed
When you have the time
What works best for me is foam rolling the muscle groups my weight training workouts will target before and/or after the session. If I am particularly sore, I’ll foam roll at night with some light static stretching work included. I even get sore from going for a hike in the mountains, so a foam roller is a must wherever I go to ensure I’m never too sore to enjoy the next day’s adventures.
For a general foam rolling work, I would recommend the above movements to be done for 1-2 minutes at a time, two-three times per week. This means 1-2 minutes doing both sides and hitting the three angles: inner, outer, and middle. Total, this should take less then 15 minutes per session.
How You Should Feel After Foam Rolling
Foam rolling work should make you feel loose and limber. If your muscles are sore, you should feel immediate relief. You will be able to feel the difference after your first time foam rolling. As you continue with foam rolling over time, you will not feel the same muscle tightness in the areas you once did.
Like exercise, if you want to see the full benefits from foam rolling, you must make it part of your daily workout routine.
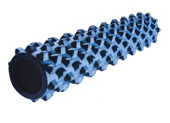
What Type of Foam Roller to Buy
I’ve come across two different types of foam rollers. A smooth surfaced foam roller and what is called a rumble roller.
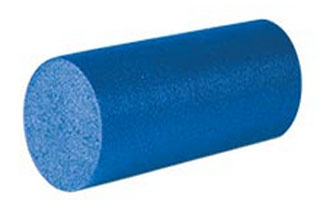
1. The smooth surfaced roller is what you want to begin with. It typically comes in two sizes. The shorter length is fine for the above exercises. You can find them for sale in specialty sporting good stores and of course, online for less than $20, the new TriggerPoint GRID roller has a mixture of harder and softer areas that works well for rolling different areas.
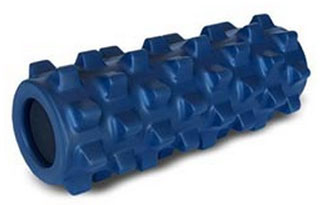
2. The second type of foam roller is named the rumble roller for its uneven surface caused by its protruding nodules. This type of roller really digs into the muscle tissue and is not for people just beginning foam roller exercises. Rumble rollers are more than double the price of their smooth counterparts, but do bring foam rolling to an entirely new level if you’re finding the regular foam roller to be less effective than it used to be.
Are There Foam Rolling Workouts Available?
You can get really good results from the above foam rolling exercises. There really are not any real workout programs on DVD that focus solely on foam rolling movements, although you can find some supposed workout moves in magazines. However, these will never be as effective as a regimen of cardio and weight training with foam rolling exercises added in.
The only program I am aware of is at the beginning of the Tai-Cheng workout, which contains about 10-15 minutes of foam rolling and dynamic stretching to work on mobility retention.
If you have foam rolled before, I am curious as to what type of results you are getting with this new technique. Please share your experiences below.
Amazing discovery…. I love my foam roller. I have been walking of crutches for a year now after falling 14metres onto concrete. My recovery is slow and recently discovered foam roller. It’s been a great help
I appreciate this very basic guidelines to fiance rolling, suitable for the Not super for person such as myself, or anyone just new to the idea. It hurts, yes, but I’m seeing results on my tight muscles very quickly.
Thanks for the article! Just got a foam roller and am starting to learn to use it, so this was really helpful.
Quick correction: the inside of your thigh has your hip ADductors, which bring your legs to your midline. The ABductors are on the outside (lateral aspect) of your thigh and are used to pull your legs away from the midline.
Recently gotten into crossfitting and found that I need to work on my Lats and my shoulders as not as flexible as should be. Recommended to foam roll especially on the lats and a trigger point on shoulder blade. Did about 20-25 minutes yesterday and work up middle of night as lats were/are super sore/painful.
Not sure if that is what is supposed to occur first few times you do it, now struggling to raise arms or apply pressure to anything. Is this feeling normal? Or am i potentially doing something wrong?
Hi Darren, what you’re feeling is not normal – you shouldn’t be more sore the day after foam rolling, and you should never be so sore from foam rolling that you wake up in the middle of the night from pain. Your muscles will always feel better the next day, or at least they’re supposed to feel better. Maximum, you should spend no more than a few minutes on each area, so with what you’ve told me about working your back for 25 minutes, it sounds like you overdid it. I hope you feel better soon.
Thanks for the great guide Bethany! I really should be rolling more but was pretty much fumbling about not knowing what moves to do. This is really helpful. I use the Trigger Point roller which is great quality and doesn’t lose its shape. They also make a cold roller too which looks interesting.
Thanks Chris! The cold roller does look interesting. I use a frozen water bottle for the arch of my foot and the cold roller looks like it would work much better. -Bethany


I want to know which foam roller is better for hamstring knots
Hi Dileep, I prefer the grid foam roller for tight hammies. Bethanu
Amazing discovery…. I love my foam roller. I have been walking of crutches for a year now after falling 14metres onto concrete. My recovery is slow and recently discovered foam roller. It’s been a great help
I appreciate this very basic guidelines to fiance rolling, suitable for the Not super for person such as myself, or anyone just new to the idea. It hurts, yes, but I’m seeing results on my tight muscles very quickly.
Hi Ann, You’re welcome! And, yes you do see results with foam rolling pretty quickly.
Thanks for the article! Just got a foam roller and am starting to learn to use it, so this was really helpful.
Quick correction: the inside of your thigh has your hip ADductors, which bring your legs to your midline. The ABductors are on the outside (lateral aspect) of your thigh and are used to pull your legs away from the midline.
Hope this helps!
Oops! Thanks for the comment.
Thanks for this!
Recently gotten into crossfitting and found that I need to work on my Lats and my shoulders as not as flexible as should be. Recommended to foam roll especially on the lats and a trigger point on shoulder blade. Did about 20-25 minutes yesterday and work up middle of night as lats were/are super sore/painful.
Not sure if that is what is supposed to occur first few times you do it, now struggling to raise arms or apply pressure to anything. Is this feeling normal? Or am i potentially doing something wrong?
Hi Darren, what you’re feeling is not normal – you shouldn’t be more sore the day after foam rolling, and you should never be so sore from foam rolling that you wake up in the middle of the night from pain. Your muscles will always feel better the next day, or at least they’re supposed to feel better. Maximum, you should spend no more than a few minutes on each area, so with what you’ve told me about working your back for 25 minutes, it sounds like you overdid it. I hope you feel better soon.
Thanks for the great guide Bethany! I really should be rolling more but was pretty much fumbling about not knowing what moves to do. This is really helpful. I use the Trigger Point roller which is great quality and doesn’t lose its shape. They also make a cold roller too which looks interesting.
Thanks Chris! The cold roller does look interesting. I use a frozen water bottle for the arch of my foot and the cold roller looks like it would work much better. -Bethany